How to send an email with JavaMail API in Android ?
As an Android developer, you’re used to send email thanks to Android standard API provided in standard SDK. To achieve that, you use Intent.ACTION_SEND and call startActivity method to delegate to OS the sending email process.
Perhaps, you would like to manage the entire process in your application when you send an email in Android. If you want to make this, the solution is to use the port of JavaMail API for Android that is available here : http://code.google.com/p/javamail-android/
This port consists in 3 jars that you must download :
- activation.jar
- additionnal.jar
- mail.jar
Once you got these jars, you can put them in the libs directory of your application project. Now, we can start the tutorial.
1. Define a JSSE Provider
First step is to define a JSSE (Java Security Socket Extension) Provider. To make that, we can get JSSE Provider of the Harmony project :
/*
* Licensed to the Apache Software Foundation (ASF) under one or more
* contributor license agreements. See the NOTICE file distributed with
* this work for additional information regarding copyright ownership.
* The ASF licenses this file to You under the Apache License, Version 2.0
* (the "License"); you may not use this file except in compliance with
* the License. You may obtain a copy of the License at
*
* http://www.apache.org/licenses/LICENSE-2.0
*
* Unless required by applicable law or agreed to in writing, software
* distributed under the License is distributed on an "AS IS" BASIS,
* WITHOUT WARRANTIES OR CONDITIONS OF ANY KIND, either express or implied.
* See the License for the specific language governing permissions and
* limitations under the License.
*/

/**
* @author Alexander Y. Kleymenov
* @version $Revision$
*/
public final class JSSEProvider extends Provider {

  public JSSEProvider() {
    super("HarmonyJSSE", 1.0, "Harmony JSSE Provider");
    AccessController.doPrivileged(new java.security.PrivilegedAction<Void>() {
      public Void run() {
        put("SSLContext.TLS", "org.apache.harmony.xnet.provider.jsse.SSLContextImpl");
        put("Alg.Alias.SSLContext.TLSv1", "TLS");
        put("KeyManagerFactory.X509", "org.apache.harmony.xnet.provider.jsse.KeyManagerFactoryImpl");
        put("TrustManagerFactory.X509", "org.apache.harmony.xnet.provider.jsse.TrustManagerFactoryImpl");
        return null;
      }
    });
  }
}
2. Implement a DataSource for data to send
To transport data during sending email, you must implement javax.activation.DataSource . Here, we choose to create a byte array implementation :
public class ByteArrayDataSource implements DataSource {
  private byte[] data;
  private String type;

  public ByteArrayDataSource(byte[] data, String type) {
    super();
    this.data = data;
    this.type = type;
  }

  public ByteArrayDataSource(byte[] data) {
    super();
    this.data = data;
  }

  public void setType(String type) {
    this.type = type;
  }

  public String getContentType() {
    if (type == null)
      return "application/octet-stream";
    else
      return type;
  }

  public InputStream getInputStream() throws IOException {
    return new ByteArrayInputStream(data);
  }

  public String getName() {
    return "ByteArrayDataSource";
  }

  public OutputStream getOutputStream() throws IOException {
    throw new IOException("Not Supported");
  }
}
3. Create Mail Sender
Third step is to create email sender object that will contain all the logic to send email. Here, we’re going to use GMail as SMTP server. So, class will be named GMailSender :
public class GMailSender extends javax.mail.Authenticator {
  private String mailhost = "smtp.gmail.com";
  private String user;
  private String password;
  private Session session;

  static {
    Security.addProvider(new JSSEProvider());
  }

  public GMailSender(String user, String password) {
    this.user = user;
    this.password = password;

    Properties props = new Properties();
    props.setProperty("mail.transport.protocol", "smtp");
    props.setProperty("mail.host", mailhost);
    props.put("mail.smtp.auth", "true");
    props.put("mail.smtp.port", "465");
    props.put("mail.smtp.socketFactory.port", "465");
    props.put("mail.smtp.socketFactory.class", "javax.net.ssl.SSLSocketFactory");
    props.put("mail.smtp.socketFactory.fallback", "false");
    props.setProperty("mail.smtp.quitwait", "false");

    session = Session.getDefaultInstance(props, this);
  }

  protected PasswordAuthentication getPasswordAuthentication() {
    return new PasswordAuthentication(user, password);
  }

  public synchronized void sendMail(String subject, String body,
    String sender, String recipients) throws Exception {
    MimeMessage message = new MimeMessage(session);
    DataHandler handler = new DataHandler(new ByteArrayDataSource(body.getBytes(), "text/plain"));
    message.setSender(new InternetAddress(sender));
    message.setSubject(subject);
    message.setDataHandler(handler);

    if (recipients.indexOf(',') > 0)
      message.setRecipients(Message.RecipientType.TO, InternetAddress.parse(recipients));
    else
      message.setRecipient(Message.RecipientType.TO, new InternetAddress(recipients));

    Transport.send(message);
  }
}
In a static block, we add our JSSE Provider to Security class.
Like our email sender is specialized for GMail, mailhost is hard coded. So, constructor takes only user and password to authenticate to SMTP server. In constructor, we define all the Properties used during the Session which we get a default instance.
You need also to override getPasswordAuthentication method and you must return a PasswordAuthentication instance that use user / password entered in constructor.
Last step is the sendMail method that takes as arguments subject, body, sender and recipients. Here, we use MimeMessage associated to current Session. Email body is transported inside our ByteArrayDataSource previously created.
To send email, we finish by call static method Transport.send with message in parameter.
4. Send an email
To send an email, don’t forget to add Internet permission to your AndroidManifest :
<uses-permission android:name="android.permission.INTERNET" />
It’s also important to send email in a separate Thread to avoid NetworkOnMainException. So, code is here :
new Thread(new Runnable() {

  @Override
  public void run() {
    try {
      GMailSender sender = new GMailSender("sylvain.saurel@gmail.com",
         "your_password");
      sender.sendMail("Hello from JavaMail", "Body from JavaMail",
         "sylvain.saurel@gmail.com", "sylvain.saurel@gmail.com");
    } catch (Exception e) {
      Log.e("SendMail", e.getMessage(), e);
  }
}

}).start();
5. Test the application
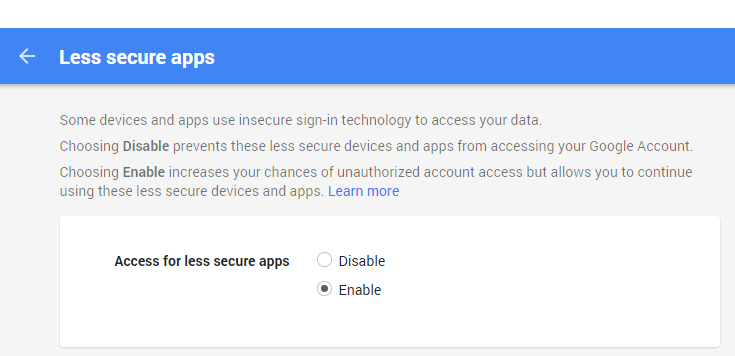
To test the application, you must authorize external access to your GMail account by going to this page : https://www.google.com/settings/security/lesssecureapps
Then, you must enable less secure apps :
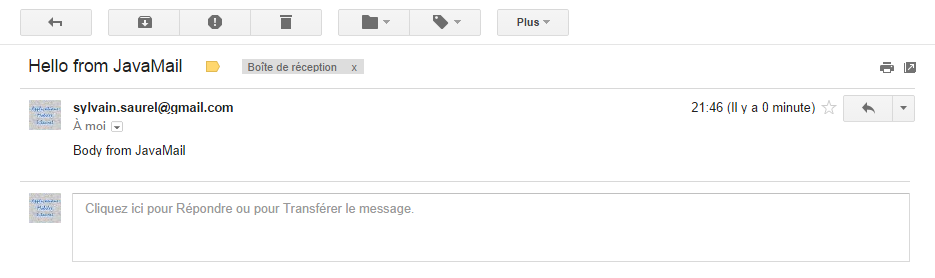
Now, you can launch your Android application and check that GMailSender works pretty well :


Leave a Reply
You must be logged in to post a comment.