Create a NFC Reader Application for Android
NFC (Near Field Communication) is an international standard for contact less exchange of data in very small range with a maximum distance of 10 centimeters between 2 devices. The specifications of NFC are made by the NFC Forum, a consortium of 170 companies and members including Mastercard, Nokia, Samsung or still Samsung.
The Android SDK offers a support to read NFC Tags and Cards in standard. In that tutorial, you are going to discover how to create an application to read NFC Tags and Cards with Android Studio.
Add NFC Permission to your Application
First, we need to add NFC Permission in the Android Manifest of our Application. We also define that the application will use the NFC feature. It is useful to hide such application from devices having no NFC support on the Google Play Store for example:
Parse data from a NFC Tag
To parse the date read from a NFC Tag, we are going to use some classes created by Google for the Android Open Source Project in demos showing how to use NFC.
So, in a record package, we will have the following classes :
- ParsedNdefRecord interface exposing the str method returning the String data read from the NFC Card. Then, we will have 3 implementations
- One for UriRecord implementing the str method and offering an isUri method letting you to know if data read from a NFC Card or Tag can be considered as an URI
- Another for TextRecord based on the same principle
- Another for SmartPoster which combines an URI and a Text
Creating a NDEF Message Parser
Data exchanged via NFC use the NDEF format. NDEF means NFC Data Exchange Format. So, to parse the data exchanged, we are going to create a NdefMessageParser class. It will expose a static parse method taking in parameter a NdefMessage and returning the content of this message as a list of ParsedNdefRecord instances.
This utilitary class will also expose a static getRecords method which will take in parameter an array of NdefRecord got from a NdefMessage object. The method will iterate on each record to parse it into an ParsedNdefRecord object.
For our NdefMessageParser class, we will adapt a code from Google for the Android Open Source Project:
Creating the User Interface
Now, we can create the User Interface of our NFC Reader Application. This interface will be really simple with just an ImageView representing a logo and a TextView used to display the data read from the NFC Tag or Card scanned.
Java Code of the NFC Reader App
Now, it’s time to write the Java Code of the Main Activity. Like previously, we will use in the MainActivity class some methods offered by Google for the Android Open Source Project:
- dumpDataTag which takes a Tag object in parameter and returns the data dumped from this tag in String format
- toHex, toReversedHex, toDec and toReversedDec utilitaries static methods letting us to print bytes in Hexadecimal an Decimal format from the data read on the Tag or the Card
In the MainActivity class, we define some properties : one for the NfcAdapter object from the Android standard SDK, another for the PendingIntent used to launch our application when a new Tag or Card will be scanned and the last for the TextView used to display the data read.
In the onCreateMethod, we get the reference from the TextView. Then, we get the default NfcAdapter instance by calling the getDefaultAdapter static method of the NfcAdapter object. If the NfcAdapter returned is null, we display a toast to the user and we finish the current activity. Otherwise, we create a PendingIntent instance pointing to the current activity:
In the onResume method, we check if the NFC is enabled by calling the isEnabled method on the NfcAdapter instance. If it is not the case, we display the wireless settings screen to let the users to enable it. For that, we have just to create an Intent with the ACTION_WIRELESS_SETTINGS action in parameter and then launching the activity associated.
If the NFC is already enabled, we call the enableForegroundDispatcher method on the NfcAdapter instance with the PendingIntent created previously. In the onPause method, it is important to disable the foreground dispatcher by calling the disableForegroundDispatch method on the NfcAdapter instance.
Next step is to override the onNewIntent method which will be called when the NFC cell will detect a NFC Card or Tag. In this method, we will call the resolveIntent method. In this method, we start by testing the action received via the Intent.
If the action received is ACTION_TAG_DISCOVERED, ACTION_TECH_DISCOVERED or ACTION_NDEF_DISCOVERED, we get the data contained in the Intent. For that, we call the getParcelableArrayExtra method on the Intent with the EXTRA_NDEF_MESSAGES constant in parameter.
If EXTRA_NDEF_MESSAGES are not null, we create NdefMessage object from these data. Otherwise, we try to get data from EXTRA_ID content from the Intent by calling the getByteArrayExtra method. We get also the Tag object. Then, we call the dumpTagData method with this tag instance in parameter. Then, we create a NdefRecord with the payload read. From this NdefRecord, we create a NdefMessage.
Finally, at the end of the method we call the displayMsgs method with NdefMessage built in parameter:
Last step is to write the code of the displayMsgs method. Inside this method, we parse the first message of the list. Then, we iterate on the ParsedNdefRecord got. For each record, we call its str method to get its content. At the end of the method, we can display the data on the TextView of our User Interface.
Testing the NFC Reader App
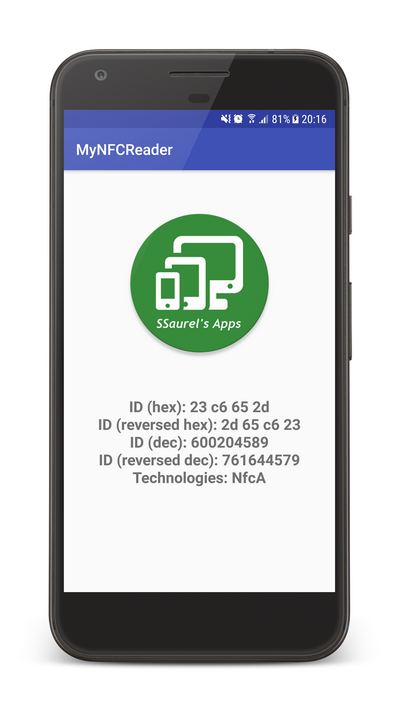
Now, it’s time to try our NFC Reader Application built in this tutorial. Once the application is launched on real device, we have to scan a NFC Card or Tag to get the following screen:
The NFC Tag scanned is well read and its data are well displayed. If you want to go further, you can discover this tutorial in video on YouTube:
Finally, if you want to test directly the result of this tutorial, you can try the following NFC Reader which is just a better looking version of what we have created in this tutorial:


Leave a Reply
You must be logged in to post a comment.