Build a Binary Converter Android App with Kotlin
A Binary Converter lets users to convert ASCII texts to Binary format. Even better, the inverse operation is also possible : converting a Binary content in equivalent ASCII text. In that tutorial, you are going to build a Binary Converter Android App with Kotlin.
Note that you can also watch this tutorial in video on YouTube too:
Creating the User Interface
We start by creating the User Interface of our Binary Converter Android Application. Our User Interface will have the following views:
- An EditText letting users to enter the text to encode or decode
- A first Button to start the encoding process
- A second Button to start the decoding process
- A TextView to display to the users the result of the encoding / decoding process
To place these views on the screen, we are going to use the ConstraintLayout API. The EditText will be centered horizontally and placed with a vertical constraint on the top of the layout parent. Then, we use a chain to place the two buttons side by side horizontally and below the EditText. Finally, we place the TextView just below the chain compounded by the two buttons.
It gives us the following code for our activity_main.xml layout file:
Encoding ASCII Text to Binary
Now, we need to create the heart of our Binary Converter Android Application : a Kotlin object letting you to encode an ASCII Text to Binary format.
In this object, we create a dedicated function named strToBinary taking in parameter an ASCII Text an returning the text encoded in Binary format. First, we split the entered text in a chars’ array. Then, we iterate on these chars. For each char, we encode the char value in binary via the Integer.toString() method. Finally, we complete the value obtained to have a String with 8 digits.
It gives us the following code:
We can try our function by passing in parameter the following String:
Hello from SSaurel Mobile Apps
It gives us the following result in Binary format:
010010000110010101101100011011000110111100100000011001100111001001101111011011010010000001010011010100110110000101110101011100100110010101101100001000000100110101101111011000100110100101101100011001010010000001000001011100000111000001110011
Decoding Binary Text to ASCII format
Obviously, the next step is to implement the inverse operation : decoding a Binary Text to ASCII format. Before trying to convert a Binary Text to ASCII format, we need to be sure the entered text represents a correct Binary value.
For that, we write an isBinary function which checks if the entered String has multiple of 8 size and if each chars in the String is equal to 0 or 1.
In our binaryToString function, we first check if the String is a correct Binary value. If not, we return a “Not a binary value” message. Otherwise, we create a chars’ array and we store the chars corresponding to the Binary numbers present in our Binary Text entered in parameter.
At the end of the function we create a String object by passing in parameter the chars’ array created. It gives us the following code on our BinaryConverter object:
We can test easily our function by passing in parameter the previously converted String in Binary format:
010010000110010101101100011011000110111100100000011001100111001001101111011011010010000001010011010100110110000101110101011100100110010101101100001000000100110101101111011000100110100101101100011001010010000001000001011100000111000001110011
In return, we get the following String:
Hello from SSaurel Mobile Apps
Our BinaryConverter object validated, we can pass to the writing of the MainActivity for our application.
Writing the Kotlin code of the Main Activity
Last step is to write the Kotlin code of the MainActivity. In the onCreatemethod, we set OnClickListener on the encode and decode buttons. When a user will click on the encode button, we will call a dedicated encode function. We make the same thing with the decode button and a decode function.
In the encode function, we get the text to convert from the EditText. Then, we pass this text on the BinaryConverter.strToBinary() method. Then, we have just to set the returned Binary value on the result TextView.
In the decode function, we get the Binary text to decode from the EditText. Then, we pass this Binary text on the BinaryConverter.binaryToString() method. Then, we have just to set the returned ASCII Text on the result TextView.
It gives us the following code for the MainActivity:
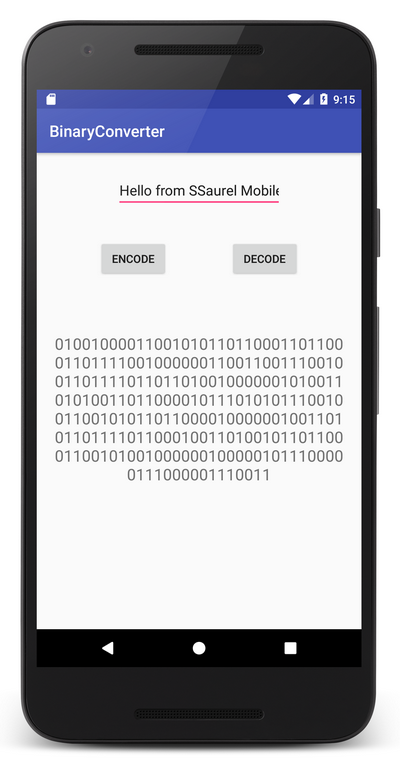
Binary Converter Android App in Action
Best part of the tutorial is coming since we are going to put our Binary Converter Android Application in Action. We launch the application on a device and we enter a String like “Hello from SSaurel Mobile Apps”. Then, you should see the following result on your screen:
To go further
To go further, you can try directly the Binary Converter Android Application on your smartphone or tablet by downloading it on the Google Play Store:

You will note that the User Interface is a little bit more polished and that the application also offers encoding / decoding in Octal and Hexadecimal format.
If you are interested to know how the encoding / encoding process works for Octal and Hexadecimal format, don’t hesitate to leave me a comment and I will make a tutorial with the Kotlin code.


Leave a Reply
You must be logged in to post a comment.