Creating a Virtual Piano Application for Android
Smartphones and tablets are always more and more powerful. In that tutorial, we are going to take profit of that by creating a virtual piano for Android. It will be an excellent way to discover how to use the Canvas API to draw the Piano on the screen but also how to play sounds with the Android SDK.
Note that you can discover this tutorial in video on YouTube too :
Choosing the appropriate Theme for our Virtual Piano App
The User Interface of our Virtual Piano will take the whole part of the screen, so we need to define a NoActionBar theme for our application in the styles.xml file :
In the Android Manifest, we define the PianoActivity only in landscape orientation :
Creating the Keys for the Piano
First, we are going to create the user interface for our Piano Application. So, we need to create a dedicated PianoView. A Piano has some keys. So, we create a Key object representing a piano’s key.
A key will have an associated sound to play and a RectF object associated to represent it on the screen. Besides, a down boolean property will be used to determine if the user is tapping on the key or no.
It gives us the following code for the Key object :
Creating a dedicated PianoView
Now, we can create our dedicated PianoView. It will override the View from the Android standard SDK. We will render 14 white keys and 10 black keys for our Piano. We will use two lists to store the white and black keys of the Piano. Finally, we define a property for the AudioSoundPlayer object we will use to play the sounds associated to each key.
It will give us the following declaration for the class :
In the constructor, we initalize the painters for the keys with a yellow painter which will be used when akey is touched by the user. Besides, we instantiate the AudioSoundPlayer object :
In the onSizeChanged callback of our PianoView object, we calculate the key’s width and we get the height for the keys. With these values, we can create the Key’s objects for the white and the black keys. For each key, we associate a RectF instance which will be used to represent them on the screen :
In the onDraw method of our PianoView, we have just to iterate on the key’s list to draw their RectF instance associated on the screen. For a white key, we use the white painter if the key is not down and the yellow painter otherwise. For a black key, we use the black painter if the key is not down and the yellow painter otherwise. And we don’t forget to draw the lines separating the white keys :
To react to the user events, we override the onTouchEvent method of the View class. First, we get the action associated to the MotionEvent passed in parameter. We consider a key is down if the type of the action is ACTION_DOWN or ACTION_MOVE.
Like our Piano will support multitouches, we need to iterate on the point touched by the user. To know the number of points touched, we call the getPointerCount method of the current event. Then, we get the coordinates of each point and we try to get the key associated by calling the keyForCoords method we will define later. If a key is well associated to the touched point, we set its down property to true.
After that, we iterate on all the keys of our Piano. If a key is down and its sound associated is not playing, we play the sound by calling the playNote method of the AudioSoundPlayer instance. Then, we redraw the PianoView by calling its invalidate method. Otherwise we release the current key by calling the releaseKey method.
If the key is not down, we call the stopNote method of the AudioSoundPlayer instance and we release the key :
Finally, we define the keyForCoords and releaseKey methods. In the first method, we iterate on the keys of the Piano to find if a key is associated to the tuple of coordinates passed in parameter. In the second method, we use a Handler object and we pass a Runnable implementation in its postDelayedmethod to release a specific Key in 100 ms. After that, we don’t forget to redraw the view to see the updates on the screen :
Just below, you can discover the complete source code for the PianoView :
Playing the music of our Piano
To play the music of our Piano, we need to create the AudioSoundPlayer object seen previously in this tutorial. Each sound will be played in a dedicated thread. So, we need a property to store the PlayThread objects. Besides, we will use a SparseArray to associate each index of the keys with a sound name. Finally, we define two constants for the volumes of the sounds we will play :
The sounds’ files will be stored in the assets folder of our Android project.
We initialize the SOUND_MAP property in a static block :
Now, we define the playNote, stopNote and isNotePlaying methods. In the playNote method, we check first if a note is already playing or no. If no, we create a new PlayThread, we start it and we add it in the thread map.
In the stopNote method, we remove the PlayThread instance associated to the entered note. Then, in the isNotePlaying method, we will check if a note is playing or no. How ? By checking if the note has a PlayThread instance present in the thread map.
It gives us the following code for these methods :
Creating the PlayThread object
Like said previously, we are going to use a dedicated thread for each sound played. So, we create a PlayThread object for this aim. The sound will be played by using the AudioTrack object of the Android standard SDK.
In the run method of our PlayThread object, we build the name of the sound to play. Then, we open the AssetFileDescriptor associated to get some info concerning the sound file to play. We build and AudioTrack instance with some specific characteristics for our sound files (Encoding in PCM 16 bits, sample rate of 44100 Hz, …).
Finally, we read the data from the sound file and we write the date read on the AudioTrack instance by calling its write method.
It will gives us the following code for the AudioSoundPlayer and the PlayThread objects :
Defining the User Interface of our Piano Application
The components of our Piano Application written, we can define the User Interface of our Piano. It will be quite simple : just a PianoView matching the parent layout :
Writing the Java code of the Piano Activity
Finally, we can just have a look to the Java code of the PianoActivity. Nothing to write, all is already good :
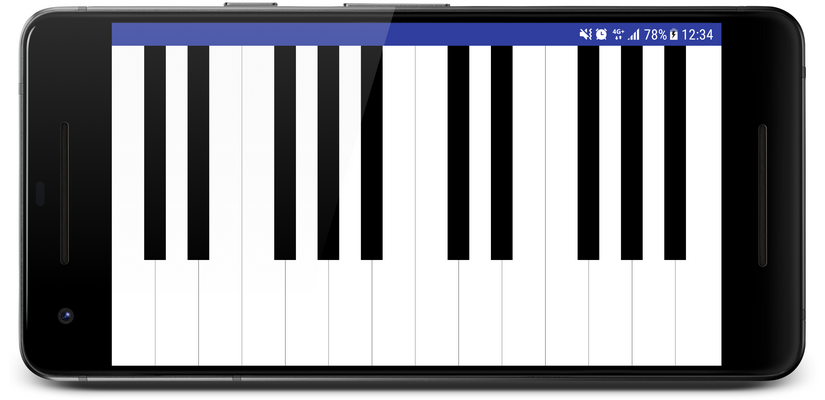
Our Virtual Piano in Action
Now, it is the best part of our tutorial since we are going to put our Virtual Piano in action. If you followed the tutorial correctly, you should have the following result on your smartphone or tablet :
To go further
To go further, you could implement a feature to record the sounds played by a user. Or, you can also implement a feature to let the users to play pre-recorded musics by coloring the keys to touch.
To try these features, you can download the Real Piano HD App on the Google Play Store. The application is based on this tutorial with these featured added :

Don’t hesitate to give me your feedback for this tutorial in comments.
You can also visit the SSaurel’s Channel on YouTube to discover more tutorials on Android Development :


Leave a Reply
You must be logged in to post a comment.