Creating a Lock Screen Device App for Android
Android SDK offers to developers a specific API, the Device Administration API, letting their users to lock the device screen directly inside an application. This feature can be interesting for some specific applications. In that tutorial, you are learning to create a Lock Screen Device App for Android using this feature.
Note that you can also discover this tutorial in video on YouTube :
Creating a dedicated XML Policy file
The Device Administration API demands the definition of a dedicated security policies file to declare which policies of the API your application will use. Our Lock Screen Device App will just use the “force-lock” policy letting us to lock the screen of the device immediately.
For that, we create a policies.xml file placed in res/xml of our Android Application Project :
Declaring the use of the Device Administration API
Next step is to declare the use of the Device Administration API in the Android Manifest of our application. To use this dedicated API, the Android Manifest must include the following :
- A subclass of DeviceAdminReceiver including the BIND_DEVICE_ADMINpermission and the ability to respond to the ACTION_DEVICE_ADMIN_ENABLED intent, expressed in the manifest as an intent filter
- A declaration of security policies used in metadata
It gives us the following code for our AndroidManifest.xml file :
Creating a subclass of DeviceAdminReceiver
In the Android Manifest, you have probably noted the presence of a MyAdminclass declared as receiver of the BIND_DEVICE_ADMIN permission. The MyAdmin class is a subclass of the DeviceAdminReceiver class part of the Android SDK.
By subclassing the DeviceAdminReceiver class, we override onEnabled and onDisabled methods. It will let us to react when our security policies will be enabled or disabled by the user within our Lock Screen Device App.
In our MyAdmin class, we just display Toast messages alerting the user :
Creating the User Interface
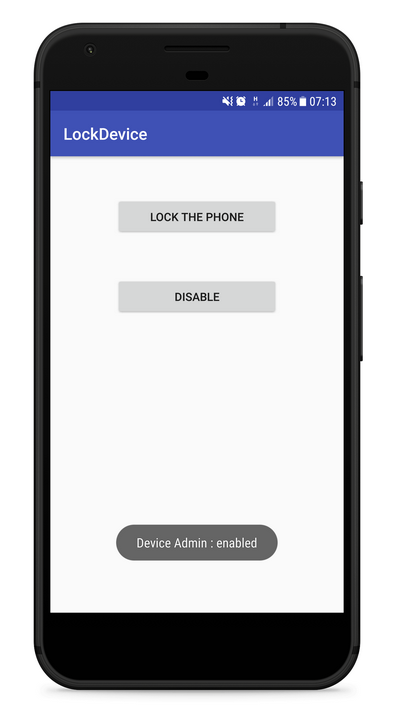
For our Lock Screen Device App, the User Interface will be quite simple with just three buttons inside a RelativeLayout view :
- A Lock button to lock the device immediately
- An Enable button to enable our security policies
- A Disable button to disable our security policies
It will have the following form :
Writing the Java code of the Main Activity
Now, it’s time to write the Java code of the Main Activity. In the onCreate method, we will get the references of the buttons and we will define the OnClickListener implementation used to manage the users’ clicks on them.
Then, we get the DevicePolicyManager system service and we create a ComponentName instance with our MyAdmin class in parameter. It will let us to check if the security policies associated to that class in the metadata are active or no for our application.
It is done by calling the isAdminActive method of the DevicePolicyManager system service instance got previously with this ComponentName instance. This call is made in the onResume method of our MainActivity.
According to the return of this call, we update the visibility of the enable and disable buttons :
Like our MainActivity implements the OnClickListener interface, we can manage the click on the buttons in the onClick method which is overrided.
When a user click on the lock button, we check if the security policies associated to our MyAdmin class are active or no. If yes, we can lock the screen immediately by calling the lockNow method of the DevicePolicyManager system service. Otherwise, we display a Toast to the user indicating him he must enable the feature.
When a user click on the enable button, we create an Intent with the DevicePolicyManager.ACTION_ADD_DEVICE_ADMIN in parameter. We put some extras like the ComponentName instance created previously and some explanations for the user. Then, we start this activity and we wait for the result. For that, we call the startActivityForResult method with the Intent in parameter.
When a user click on the disable button, we remove our security policies by passing our ComponentName instance in parameter of the removeActiveAdmin on the DevicePolicyManager object instance. And we don’t forget to manage the visibility of the enable / disable buttons too :
Finally, ne need to override the onActivityResult method to handle the result of the starting of the activity to enable the admin features. We check if the resultCode is equal to Activity.RESULT_OK. If yes, we display a message to the user to tell him the Admin Device features have been enabled. Otherwise, we display a message to tell him the Admin Device features have been disabled.
It gives us the following code for the MainActivity :
Testing our Lock Screen Device App
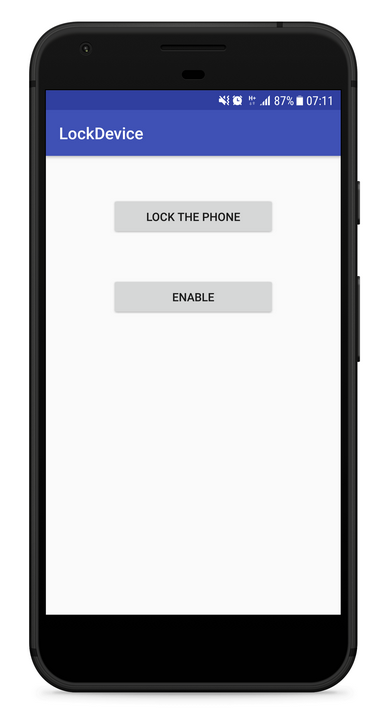
It is the best part of our tutorial since we are going to test our Lock Screen Device Application. When you launch the application, you should see the following screen :
Click on the lock button and you should see the following message on the screen :
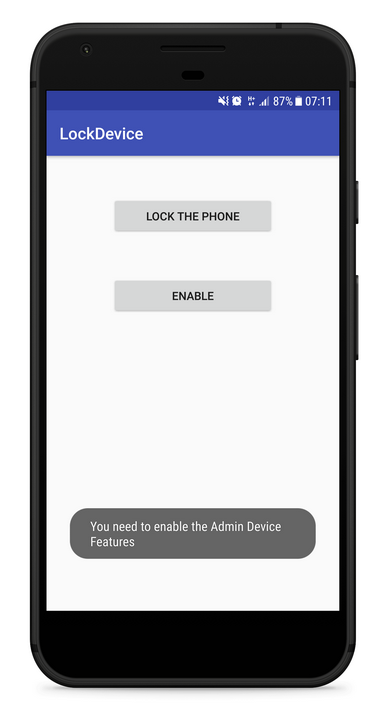
So, you need to enable the Admin Device Features. Click on the enable button for that. You should see the following screen to enable the Admin Device Features :
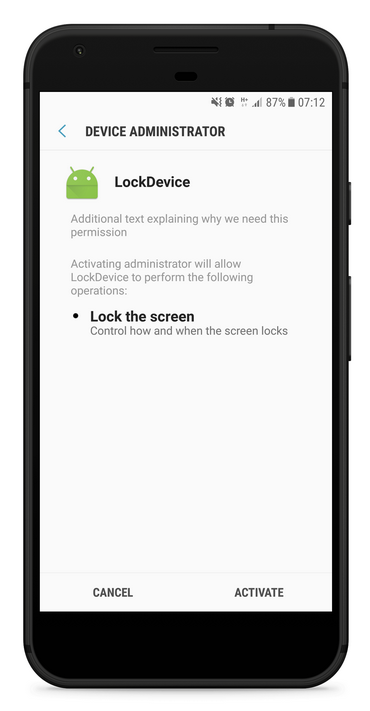
Like you can see, our Lock Screen Device App will just allow to lock the screen immediately. Click on activate and you should see the following screen :
The Device Admin Features have been enabled. Now, you can click on the lock button and the device will be locked immediately.
That’s all for that tutorial ! You can find the complete source code on GitHub : https://github.com/ssaurel/LockScreenDevice
To discover more tutorials on Android development, you can subscribe to the SSaurel’s Channel :


1 Comment Already
Leave a Reply
You must be logged in to post a comment.
you code running well, but finger unlock option is missed when i use app !