Getting started with Google Maps Android API V2 – Part 1
Google Maps provides to Android developers a powerful API to display maps in applications. Google Maps API V2 is now part of Google Play Services.
1. Get Google Play Services
First, you need to get Google Play Services to use in your Android application. If you use Android Studio, you must simply add the following dependency to your Gradle build file :
apply plugin: 'com.android.application'

...

dependencies {

    compile 'com.android.support:appcompat-v7:21.0.3'
    compile 'com.google.android.gms:play-services:6.5.87'

}
Dependency to appcompat-v7 is also mandatory here.
If you use Eclipse ADT, you must copy the library project of Google Play Services API from <android-sdk>/extras/google/google_play_services/libproject/google-play-services_lib/ on your computer to your workspace and then import in Eclipse ADT.
2. Add Google Play Services version in Android Manifest
Now, you must add Google Play Services API version in your Android Manifest :
<meta-data android:name="com.google.android.gms.version"
           android:value="@integer/google_play_services_version" />
3. Get an Android certificate to sign your application
To use, Google Maps API, you need to sign your application. So, you need to create a certificate that will be useful to publish your app on Google Play Store for example.
Guide to generate certificate and sign an application can be found here from Android developer documentation : https://developer.android.com/tools/publishing/app-signing.html
4. Display SHA-1 of your Android certificate
Now, you need to display the SHA-1 fingerprint of your Android certificate that will be useful later to get Google Maps API key.
To display SHA-1 fingerprint, you must follow the guide of keytool that is in standard in JDK and can be found here : http://docs.oracle.com/javase/6/docs/technotes/tools/windows/keytool.html
5. Create an API Project in the Google APIs Console
After that, you need to create an API Project in Google APIs Console here : https://console.developers.google.com/ .
This is here that you can monitor request made from your application to Google Services that you use and enable. Most of services have usage limits and so it’s important to check here if you need more quotas for example.
So, you can create a project from your application. Click on entry APIs and auth in the left menu. Then, you must enable Google Maps Android API V2 service for your new project.

6. Obtain a Google Maps API key
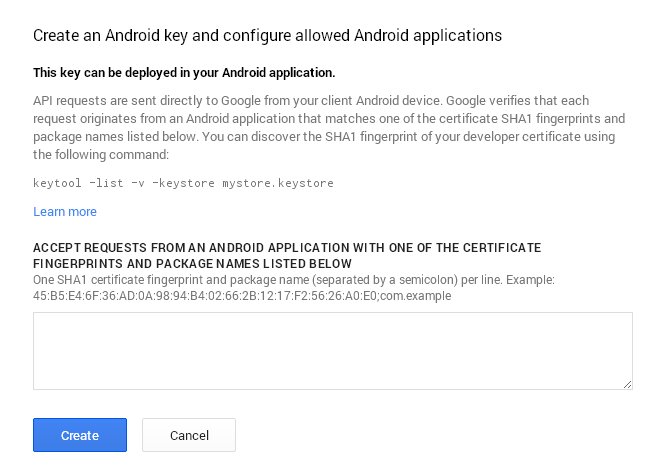
Now, you must obtain a Google Maps API key. Go on credentials entry and click on create new below Public API Access title.
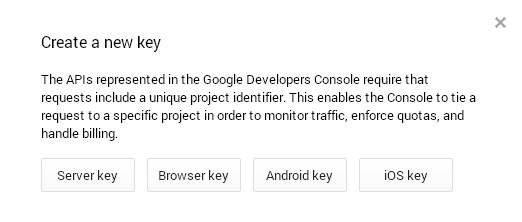
Choose to create an Android API key. In the text area, you must enter the SHA-1 fingerprint you got earlier when you created a certificate for your application.
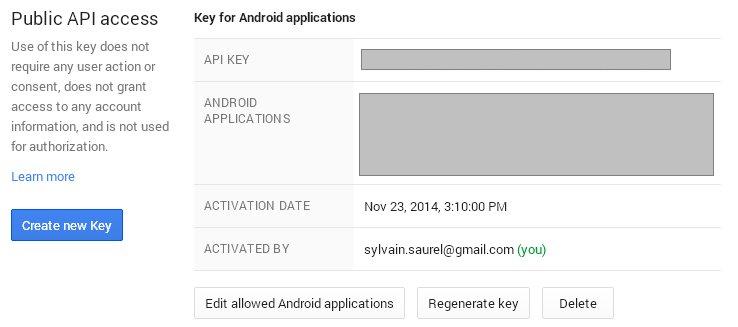
Once it’s done, you have a Google Maps API key available for your Android application :
7. Add the Google Maps API key to your Android Manifest
You must add the following tag as a child of application tag :
<meta-data
  android:name="com.google.android.maps.v2.API_KEY"
  android:value="API_KEY"/>
8. Add permissions to your Android Manifest
In order to use Google Maps in your application, you must add these permissions that are mandatory :
<uses-permission android:name="android.permission.INTERNET"/>
<uses-permission android:name="android.permission.ACCESS_NETWORK_STATE"/>
<uses-permission android:name="android.permission.WRITE_EXTERNAL_STORAGE"/>
INTERNET permission lets API download tiles from Google Maps servers where as ACCESS_NETWORK_STATE allow API to check connection status before to perform data downloads. The last one, WRITE_EXTERNAL_STORAGE, allows the API to cache map tile data in the device’s external storage area.
Others permissions are optional but can be needed if you plan to use the user’s current location :
<uses-permission android:name="android.permission.ACCESS_COARSE_LOCATION"/>
<uses-permission android:name="android.permission.ACCESS_FINE_LOCATION"/>
9. Specify requirement for OpenGL ES version 2
Google Maps Android API using OpenGL ES version 2 to render map, you must specify that your application require this feature to work because if it’s not installed on user’s device, map will not appear. Add the following tag as a child of the manifest element in your Android Manifest :
<uses-feature
  android:glEsVersion="0x00020000"
  android:required="true"/>
10. Create layout fragment for your map
To display your map, you must create a XML layout in res/layout directory. Name your file main.xml . The fragment is like that :
<?xml version="1.0" encoding="utf-8"?>
<fragment xmlns:android="http://schemas.android.com/apk/res/android"
  android:id="@+id/map"
  android:layout_width="match_parent"
  android:layout_height="match_parent"
  android:name="com.google.android.gms.maps.MapFragment"/>
11. Create your main activity
In your main activity, you must just set content view :
package com.ssaurel.mapproject;

import android.app.Activity;
import android.os.Bundle;

public class MainActivity extends Activity {

  @Override
  protected void onCreate(Bundle savedInstanceState) {
    super.onCreate(savedInstanceState);
    setContentView(R.layout.main);
  }

}
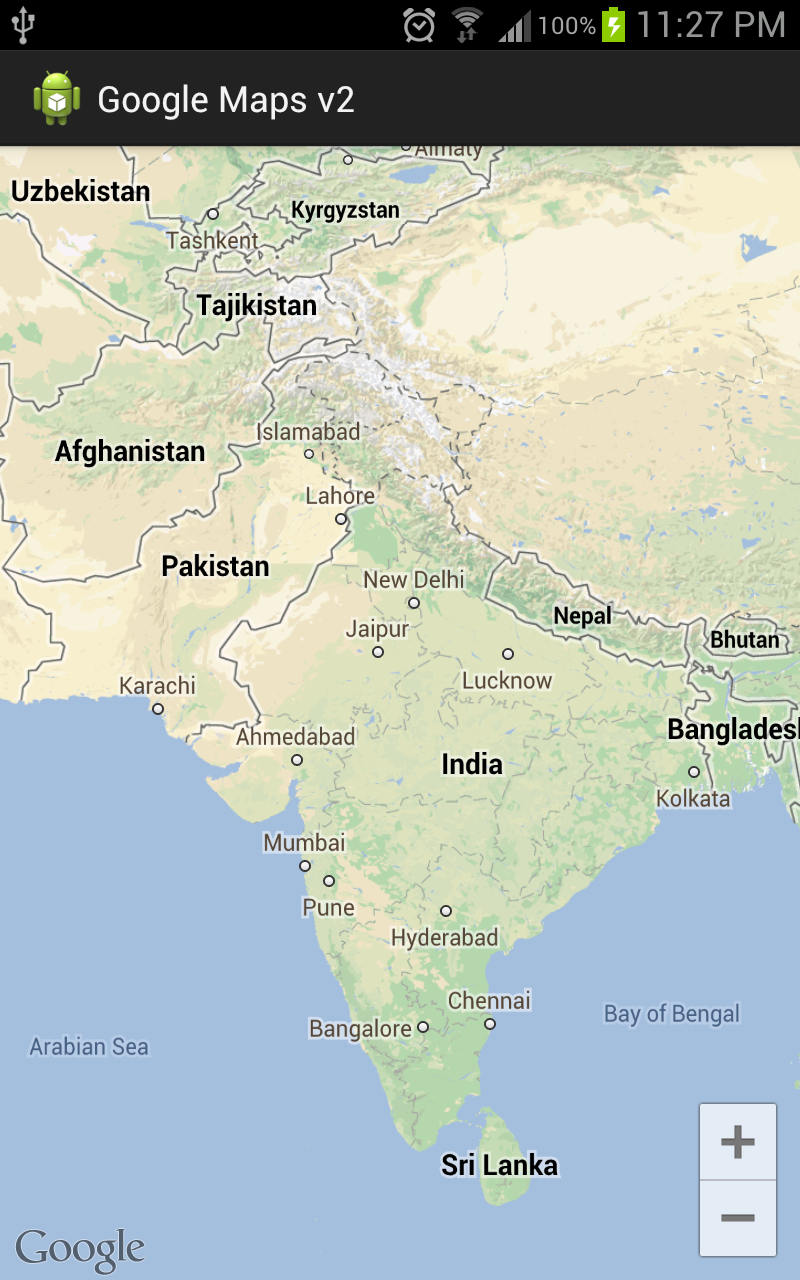
12. Display your map
Last step is easier. Build and run your application. You should see a map displayed if you have achieved with success this tutorial.
13. And now ?
Now that you can display map from Google Maps Android API V2 in your application, you would like to add some controls, show some overlays or use navigation API for example. Be patient, it will be explained in other parts of this tutorials’ serie about Google Maps API V2.


Leave a Reply
You must be logged in to post a comment.